It's no secret that I'm a big proponent of testing, and lately I've been getting a lot of questions around how to approach getting started and what technologies to use. While I have a good amount of content coming out around this, some already announced, some to be announced soon, I thought I would also try to take some time to put together a few posts on the subject as well.
In this post I'm going to focus on setting up unit testing for Xamarin apps using the xUnit framework. If you've followed my testing content in the past, you might remember me recommending the usage of NUnitLite a few years back as the framework of choice. At the time that was the best option, but these days xUnit has a far superior cross-platform story (major props to Oren Novotny for helping drive that forward!), in addition to just being a more modern framework in general. The biggest downside, at least at the time of writing this, is that there isn't any sort of integration with Xamarin Studio, but hopefully that story will improve as well.
Creating The Test Project
To start off, create a portable class library for your tests to live in. Alternatively you could also go with a shared project if you'd prefer, but unless you need it I recommend sticking with a PCL. Using a PCL will enable you to easily run the tests in any xUnit test runner, such as Visual Studio, the command line, iOS, Android, or Windows Phone.
Once that's created, add the xUnit.net NuGet package:
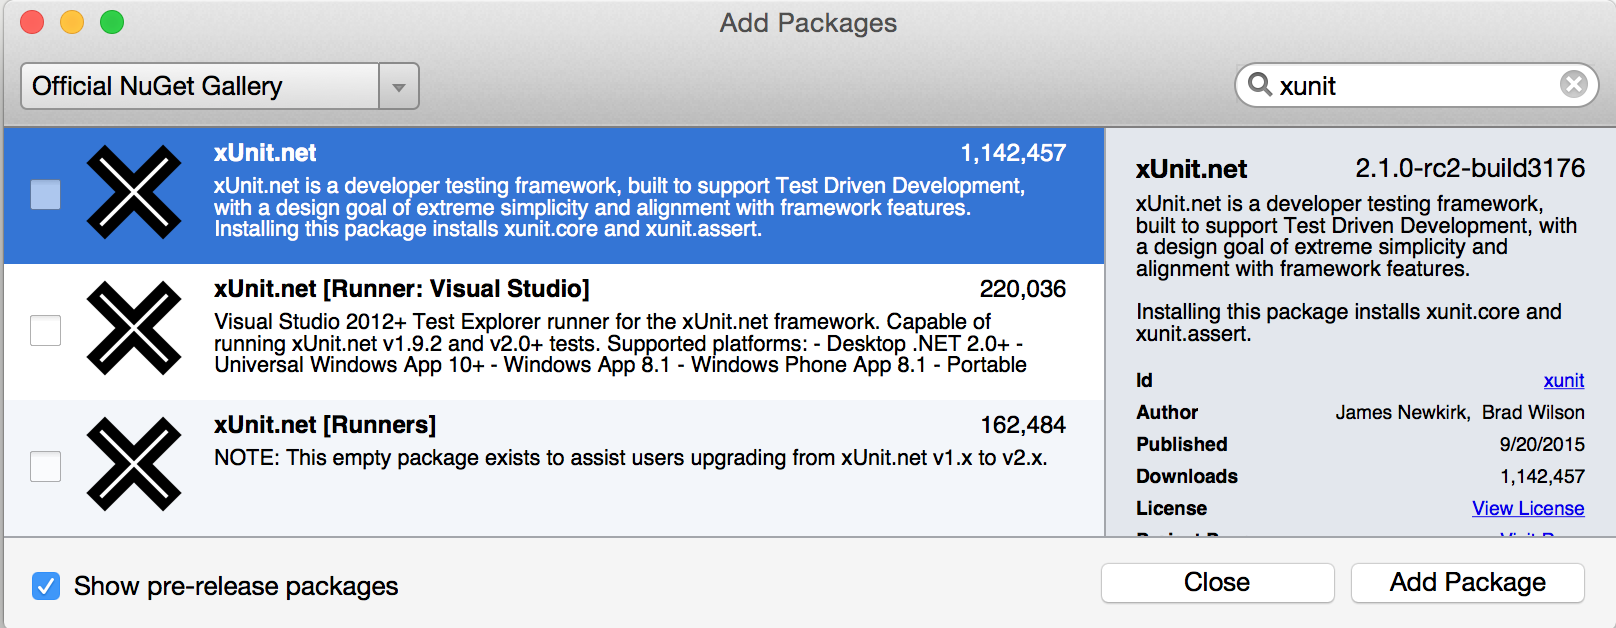
As of the time of this post I recommend installing the pre-release version of xUnit, as pictured here, which brings with it improved Mono support. Similiarly, Xamarin's Alpha channel currently ships with an updated version of Mono that improves xUnit support. Both of these should hit the stable channels soon so this recommendation will be short-lived, but I wanted to point it out in the meantime.
In addition to the main xUnit package, also go ahead and install the console runner package. If you'd also like to run the tests in Visual Studio, you can add the Visual Studio runner package as well.
With those installed, let's create some tests:
using System;
using System.Threading.Tasks;
using Xunit;

namespace TestDemo
{
    public class TestsAreGood
    {
        [Fact]
        public void ThisShouldPass()
        {
            Assert.True(true);
        }

        [Fact]
        public async Task ThisShouldFail()
        {
            await Task.Run(() => { throw new Exception("boom"); });
        }
    }
}
Obviously these are pretty trivial, but as you can see xUnit has support for async tests. In fact, it has much better support for async tests than the version of NUnit that ships with Mono/Xamarin Studio, which is another awesome advantage to going with xUnit.
Runner: Console
Now that we have tests, let's start by running them from the console:
> mono packages/xunit.runner.console.2.1.0-rc2-build3176/tools/xunit.console.exe TestDemo/bin/Debug/TestDemo.dll

xUnit.net Console Runner (32-bit .NET 4.0.30319.17020)
  Discovering: TestDemo
  Discovered:  TestDemo
  Starting:    TestDemo
    TestDemo.TestsAreGood.ThisShouldFail [FAIL]
      System.Exception : boom
      Stack Trace:
        <trimmed>
  Finished:    TestDemo
=== TEST EXECUTION SUMMARY ===
   TestDemo  Total: 2, Errors: 0, Failed: 1, Skipped: 0, Time: 0.100s
As expected, we had one test pass and one fail. I suggest creating a script to allow you to easily and quickly run these tests to lower the friction to running the tests going forward. You could even set up a monitor on the DLL file and automatically re-run your tests each time you compile!
Runner: iOS
The console runner is great and all, but we're doing mobile development here, so it really only matters if our code works in that environment. Lucky for us the xUnit cross platform story is awesome, so it's nice and easy to get these tests running there as well.
Start off by creating a new single view iOS project, and then delete the generated storyboard and view controller files. Also make sure go into your Info.plist file and remove the "main interface" references to the storyboard. Next, add a project reference to the main PCL test project from before.
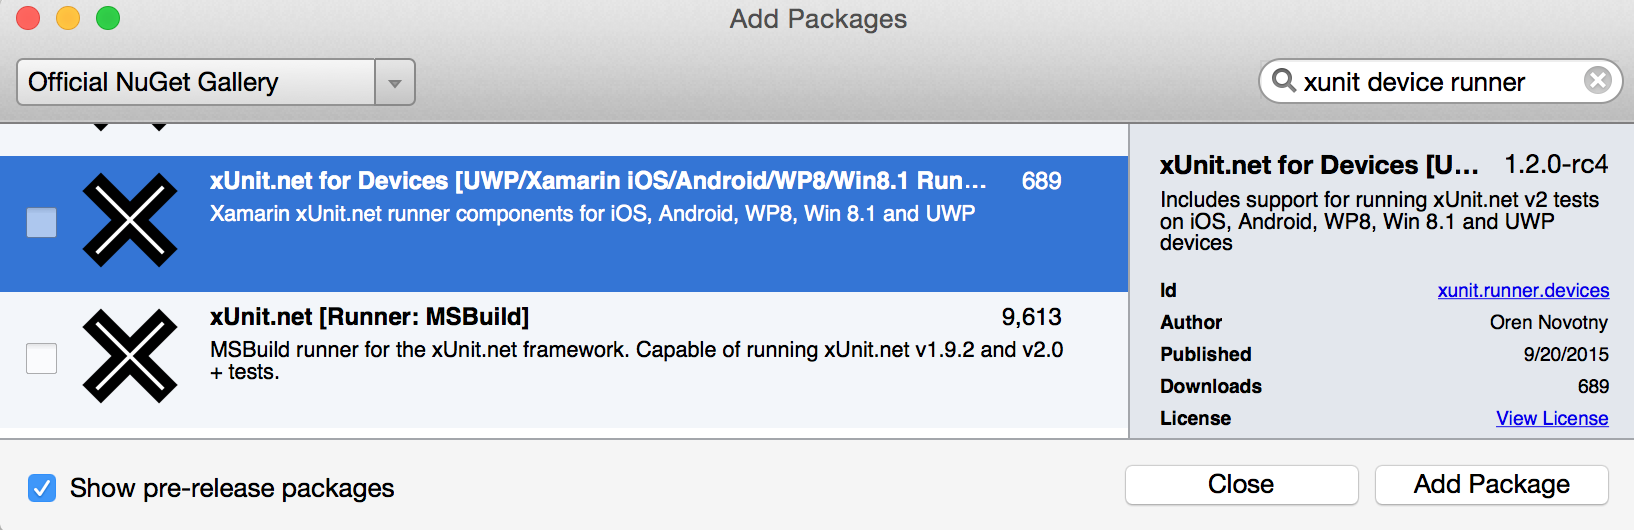
With that set up, add the xUnit.net for Devices NuGet package:
That NuGet package will add a new file to your solution named AppDelegate.cs.txt. Go ahead and copy the contents of that file and replace the contents of AppDelegate.cs with it. After that you can go ahead and delete the AppDelegate.cs.txt file if you like.
if you take a look in the code now in AppDelegate.cs, you'll see some references to a function named AddTestAssembly(). This is what you can use to tell xUnit which assemblies to scan for tests. By default it will include an instruction to scan the current assembly, but in our case that won't return anything since our tests are in a separate library. If you had been using a shared code project, this default scan would be sufficient.
Replace the existing AddTestAssembly() call with:
AddTestAssembly(typeof(TestsAreGood).Assembly);
Set the iOS project as the solution's startup project and run it:
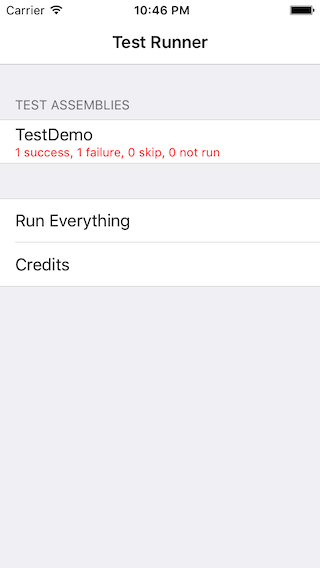
Your tests are now running in iOS without having to change anything! You can run them either in the simulator or on a device to validate that your code truly works across the board.
Runner: Android
With iOS out of the way, let's also get these tests running on Android. The process here is very similar to setting up iOS. Create a new Android project, add a reference to the test library, and add the same xUnit.net for Devices NuGet package that we added to iOS.
Just like with iOS, the package will add a MainActivity.cs.txt file to your solution. Take the contents of that file and overwrite what's in MainActivity.cs. Update the AddTestAssembly() call in there with the same line as before:
AddTestAssembly(typeof(TestsAreGood).Assembly);
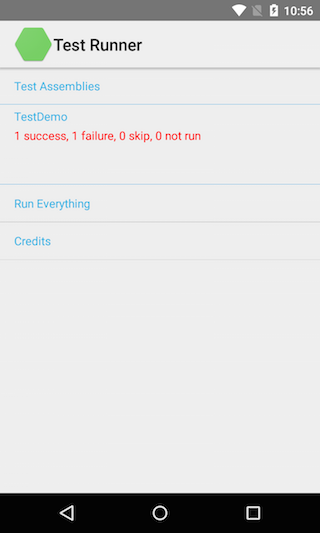
Set the Android runner as the startup project, fire up your favorite emulator or device, and voilà!
Summary
Setting up these runners are just a one-time thing, as they will continue to pick up new tests you add each time you run them. With just a few minutes of effort you can set up an environment where not only can you verify that your code runs properly on the full .NET or Mono frameworks, but also that they run on the device environments that really count here. In future posts I'll explore some other tips for unit testing your apps, as well as step into other areas like UI testing, Test Cloud, and more.