One of the really cool new features in ASP .NET MVC 2 is templated helpers. The basic idea is that you can define a template for either displaying or editing a particular data type, and it will be used by default when displaying or editing that type. This allows you to define the behavior once, and then you don’t need to worry about it in every view you write thereafter. In this post I’ll go over how to use templated helpers to handle both a built-in type, DateTime, as well as a custom type which will demonstrate using a custom model binder.
If you haven’t already done so, I suggest reading through Brad Wilson’s series on templated helpers to give you a good idea of the basics, which I will briefly touch on but not in much detail.
DateTime
First we’ll take a look at the simple case. Let’s say you have a view model that contains a DateTime property:
public class DateTestViewModel
{
    [DisplayName("Birth date")]
    public DateTime DateOfBirth { get; set; }
}
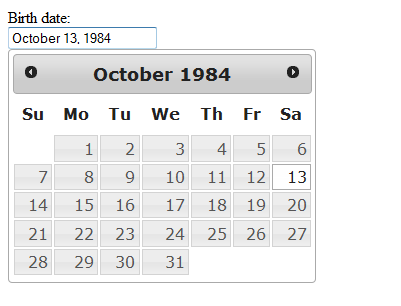
When we display a form for that view model, by default MVC will give you a text box for editing the date. Obviously this isn’t a very user-friendly way to edit a date, so let’s use progressive enhancement to spruce it up with a jQuery UI date picker. Since we’ll want to do this globally across the site, this is a perfect scenario to use a templated helper. For the sake of this demo I’ll keep everything contained in a single view, just to keep things simple. Here is the view code for displaying the editor for the date:
<% using (Html.BeginForm())
   { %>
    <p>
        <%= Html.LabelFor(model => model.DateOfBirth) %>:
        <br />
        <%= Html.EditorFor(model => model.DateOfBirth) %>
    </p>
    <p>
        <input type="submit" value="Submit" />
    </p>
<% } %>
To start, we create a folder under Views/Shared called EditorTemplates. Creating it under Shared allows any view to make use of the templates inside of it. If you want to limit it to a single set of views, you can put the folder inside that view folder. In that folder, let’s create a new view user control that looks like this, named DateTime.ascx:
<%@ Control Language="C#" Inherits="System.Web.Mvc.ViewUserControl<System.DateTime?>" %>

<%= Html.TextBox("", (Model.HasValue ? Model.Value.ToString("MMMM d, yyyy") : string.Empty), new { @class = "date" }) %>
All we’re doing is creating a textbox for the model, which is a nullable DateTime, and assigns it the class of “date.” Now with jQuery we can quickly attach a date picker to any text input with that class:
$(document).ready(function()
{
    $("input:text.date").datepicker(
    {
        dateFormat: "MM d, yy"
    });
});
And that’s it! Now any time you create an editor for a DateTime property, you’ll get a slick date picker.
SimpleDate
Now let’s say you want to do this with some custom types you have. Can you still use templated helpers to define your views and editors? Of course you can! The only difference is that now you also need to tell MVC how to bind the form input to an object. Continuing with the date theme, let’s implement a simpler version of the date, where you simply want to select a month and a year, leaving out the day of the month. Here’s the class definition for SimpleDate:
public class SimpleDate
{
    [Range(1, 12)]
    public int Month { get; set; }

    [Range(1, 9999)]
    public int Year { get; set; }

    public SimpleDate()
    {
    }

    public SimpleDate(DateTime date)
        : this(date.Year, date.Month)
    {
    }

    public SimpleDate(int year, int month)
    {
        Year = year;
        Month = month;
    }

    public DateTime ToDate()
    {
        return new DateTime(Year, Month, 1);
    }
}
We'll also add it to our view model:
[DisplayName("Billing month")]
public SimpleDate BillingMonth { get; set; }
As well as add it to the view:
<p>
    <%= Html.LabelFor(model => model.BillingMonth) %>:
    <br />
    <%= Html.EditorFor(model => model.BillingMonth) %>
</p>
While we’re at it, let’s define a simple template for it, in the same folder as the last one, called SimpleDate.ascx:
<%@ Control Language="C#" Inherits="System.Web.Mvc.ViewUserControl<TemplatedHelpers.Models.SimpleDate>" %>
<%@ Import Namespace="TemplatedHelpers.Extensions" %>

<%= Html.MonthDropDownListFor(model => model.Month, Model.Month) %>

<%= Html.YearDropDownListFor(model => model.Year, Model.Year) %>
Astute readers will have noticed that I used a couple custom extension methods in there for creating the drop down lists. I wrote them up as a quick example for this demo, so while they are not perfect, they get the idea across since that isn’t the focus of this post. Here is the code I have for those functions:
public static class HtmlHelperExtensions
{
    private static string[] _months =
    {
        "January", "February", "March", "April", "May",
        "June", "July", "August", "September", "October",
        "November", "December"
    };

    private static IEnumerable<SelectListItem> getMonthListItems(int? selectedMonth)
    {
        var monthList = new List<SelectListItem>();

        for (int i = 0; i < _months.Length; i++)
        {
            monthList.Add(new SelectListItem
            {
                Text = _months[i],
                Value = (i + 1).ToString(),
                Selected = (selectedMonth == (i + 1))
            });
        }

        return monthList;
    }

    private static IEnumerable<SelectListItem> getYearListItems(int? selectedYear)
    {
        var yearList = new List<SelectListItem>();

        for (int i = 2006; i <= DateTime.Now.Year; i++)
        {
            yearList.Add(new SelectListItem
            {
                Text = i.ToString(),
                Value = i.ToString(),
                Selected = (selectedYear == i)
            });
        }

        return yearList;
    }

    public static MvcHtmlString MonthDropDownListFor<TModel, TProperty>(this HtmlHelper<TModel> htmlHelper, Expression<Func<TModel, TProperty>> expression, int? selectedMonth)
    {
        return htmlHelper.DropDownListFor(expression, getMonthListItems(selectedMonth));
    }

    public static MvcHtmlString YearDropDownListFor<TModel, TProperty>(this HtmlHelper<TModel> htmlHelper, Expression<Func<TModel, TProperty>> expression, int? selectedYear)
    {
        return htmlHelper.DropDownListFor(expression, getYearListItems(selectedYear));
    }
}
So now we have a custom type and the template for editing it, but if you try to post the form you’ll see that you lose any value you have set on it. Why is this? By default, MVC doesn’t know how to bind the form data. To fix that, we can create our own model binder class, which extends the System.Web.Mvc.DefaultModelBinder class:
public class SimpleDateModelBinder : DefaultModelBinder
{
    public override object BindModel(ControllerContext controllerContext, ModelBindingContext bindingContext)
    {
        int month = getValue<int>(bindingContext, "Month").Value;
        int year = getValue<int>(bindingContext, "Year").Value;

        return new SimpleDate(year, month);
    }

    private Nullable<T> getValue<T>(ModelBindingContext bindingContext, string key) where T : struct
    {
        if (string.IsNullOrEmpty(key))
        {
            return null;
        }

        ValueProviderResult result = bindingContext.ValueProvider.GetValue(bindingContext.ModelName + "." + key);

        if (result == null && bindingContext.FallbackToEmptyPrefix)
        {
            result = bindingContext.ValueProvider.GetValue(key);
        }

        if (result == null)
        {
            return null;
        }

        return (Nullable<T>)result.ConvertTo(typeof(T));
    }
}
There are a lot of extension points you can tie into with model binders, but here we’ll just keep things as simple as possible. Luckily, that’s all we really need. The getValue() function is inspired by a similar post by Scott Hanselman, and looks through the binding context for the provided key and type, and returns the value if it finds it. Since the keys here are coming from form data, they will be in the form of PropertyName.Month and PropertyName.Year. The BindModel() function grabs these values for the current model being bound, and returns a new SimpleDate based on it.
One last thing to do here, and that is to tell MVC to use that model binder when it encounters SimpleDate. Open up global.asax, and add this into the Application_Start handler:
ModelBinders.Binders.Add(typeof(SimpleDate), new SimpleDateModelBinder());
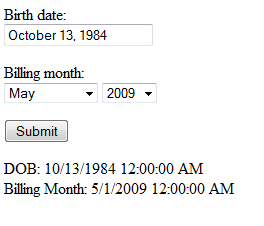
Need some proof that it works? Of course you do. Let’s add a little bit of code to the view and controller to stuff the values into ViewData when it POSTs, and then display them in the view. Here is our controller action:
[HttpPost]
public ActionResult Index(DateTestViewModel viewModel)
{
    ViewData["DateOfBirth"] = viewModel.DateOfBirth;
    ViewData["BillingMonth"] = viewModel.BillingMonth;

    return View(viewModel);
}
Then in the view we will display it, when it’s there:
<p>
    <% if (ViewData["DateOfBirth"] != null)
       { %>

        DOB: <%= ViewData["DateOfBirth"] %>
        <br />

    <% } %>

    <% if (ViewData["BillingMonth"] != null)
       { %>

        Billing Month: <%= ((TemplatedHelpers.Models.SimpleDate)ViewData["BillingMonth"]).ToDate() %>
        <br />

    <% } %>
</p>
Now when you submit the form, you should see the date values for both date fields on the page displayed at the bottom.
Now we have a slick date picker for when we need to choose a specific date, and a nice option for picking a month and year, all thanks to MVC templated helpers.