If you’ve been doing mobile development, you probably know all about the problem of having to target multiple platforms, along with the languages each one requires. Having to rewrite and support essentially the same code on different platforms flat out sucks, and isn’t really a great way to spend your time. Thanks to the fine folks working on Mono and its satellite projects, it’s possible to leverage the power of the .NET framework across many platforms. In this article I’ll focus on sharing the same code across Android and Windows Phone 7, but you’ll easily see how it could be extended to Silverlight, ASP.NET or iOS without much effort at all.
These days it seems like the ubiquitous mobile app example is some sort of Twitter client, so why should I be any different? We’ll build a very simple app that let’s you search Twitter for a given term. First, let’s set up the projects we’re going to need in a new solution. This post assumes that you’re using a non-express edition of Visual Studio 2010 since that’s what MonoDroid requires.
Setup
First, make sure you have the Project Linker extension installed in Visual Studio. This extension makes it really easy to share code between projects without having to manually copy code over and maintain changes. You can find it by just searching in Visual Studio’s Extension Manager (Tools -> Extension Manager). Once that’s installed, set up the following projects in a blank solution:
- TwitterSearcher: a normal .NET class library
- TwitterSearcher.MonoDroid: a MonoDroid class library
- TwitterSearcher.WP7: a Windows Phone class library
- App.MonoDroid: a MonoDroid application
- App.WP7: a Windows Phone 7 Silverlight application
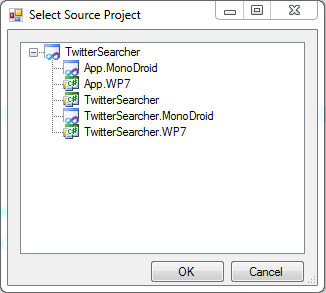
Now for TwitterSearcher.MonoDroid and TwitterSearcher.WP7, right click on the projects and select “Add project link”. In the dialog that pops up, select the TwitterSearcher project. This will set it up so that when you add any source files to TwitterSearcher (the source project), they will automatically be added to the destination projects. Since they all share the same physical file, changes are shared automatically. When you add a project link it will not automatically pick up files that are already in the source project, so a quick workaround to that is to exclude them from the project, and then re-include them.
For App.MonoDroid and App.WP7, add references to TwitterSearcher.MonoDroid and TwitterSearcher.WP7, respectively. Also add a reference to System.Xml.Linq for TwitterSearcher.WP7.
Why Is This Necessary?
You might be wondering why we need to go through all this effort to share code. After all, isn’t everything running on .NET in the end? The short answer is that each platform compiles its assemblies against a different platform. For these projects, Windows Phone 7 will compile against Silverlight, whereas MonoDroid will compile against the Mono libraries it includes. You can generally use the same source code across them (we’ll talk about how to handle exceptions later), but they should be compiled against the correct platform.
In some cases you might be able to get away with adding references to assemblies and projects compiled for other platforms, but you can run into issues, particularly with debugging. When dealing with your own code like we are here, it’s best to just target the right platform to make sure things work like you’d expect.
Building Out TwitterSearcher
I wasn’t lying when I said this would be a very simple app. We’ll set up a small POCO for holding the data in a tweet, and then set up a class that handles searching. First, here’s the model:
public class Tweet
{
    public DateTime Published { get; set; }
    public string Title { get; set; }
    public string Author { get; set; }
}
Here’s the class we’ll use to search Twitter:
public class Searcher
{
    private string _baseSearchUrl;
    private static XNamespace _namespace = "http://www.w3.org/2005/Atom";

    public Searcher(string baseUrl)
    {
        _baseSearchUrl = baseUrl;
    }

    public void Search(string query, Action<IEnumerable<Tweet>> callback)
    {
        var searchClient = new WebClient();

        searchClient.DownloadStringCompleted += (sender, e) =>
        {
            IEnumerable<Tweet> results =
                XElement.Parse(e.Result)
                    .Descendants(_namespace + "entry")
                    .Select(entry => new Tweet()
                    {
                        Title = (string)entry.Element(_namespace + "title"),
                        Published = DateTime.Parse((string)entry.Element(_namespace + "published")),
                        Author = (string)entry
                                            .Descendants(_namespace + "author")
                                            .First()
                                            .Element(_namespace + "name")
                    });

            callback(results);
        };
        searchClient.DownloadStringAsync(new Uri(_baseSearchUrl + Uri.EscapeDataString(query)));
    }
}
There we harness the power of LINQ To XML to make it easy to parse Twitter’s search results. In the interest of full disclosure, I will say that one reason I went for the asynchronous request was because I knew that Silverlight does not let you make synchronous requests, which you’ll find out at runtime when the app blows up. Keeping things asynchronous is a good practice anyway, since it helps make sure that your long running operations don’t tie up the UI thread in the app, allowing it to stay responsive.
That’s all of our shared code. It’s very simple, but you can see that the core functionality of the apps (searching Twitter) is encapsulated in the same code. You should now be able to compile the solution and have it build all the versions of the library, along with the empty applications that reference them.
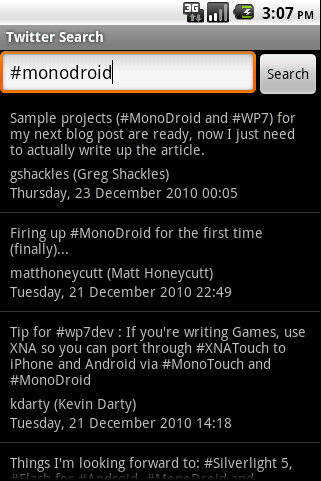
The Android App
First we’ll build the Android version of the app. You can delete any default activities and layouts added by the project. Under Resources/layout, add an XML file named main.xml that defines our main application layout:
<?xml version="1.0" encoding="utf-8"?>
<LinearLayout xmlns:android="http://schemas.android.com/apk/res/android"
    android:orientation="vertical"
    android:layout_width="fill_parent"
    android:layout_height="fill_parent">
    <LinearLayout
        android:orientation="horizontal"
        android:layout_width="fill_parent"
        android:layout_height="wrap_content">
        <EditText
            android:id="@+id/query"
            android:layout_width="wrap_content"
            android:layout_height="wrap_content"
            android:layout_weight="1.0"
            android:lines="1"
            android:imeOptions="actionGo"
            android:selectAllOnFocus="true" />
        <Button
            android:id="@+id/search_button"
            android:layout_width="wrap_content"
            android:layout_height="wrap_content"
            android:text="Search" />
    </LinearLayout>
    <ListView
        android:id="@+id/results"
        android:layout_width="fill_parent"
        android:layout_height="fill_parent" />
</LinearLayout>
It’s just a simple text box, a search button, and a list of results. In that same layout folder, also create tweet_item.xml that declares what a simple search result will look like in the list:
<?xml version="1.0" encoding="utf-8" ?>
<LinearLayout xmlns:android="http://schemas.android.com/apk/res/android"
    android:orientation="vertical"
    android:layout_width="fill_parent"
    android:layout_height="fill_parent"
    android:padding="10sp">
    <TextView
        android:id="@+id/tweet_text"
        android:layout_width="fill_parent"
        android:layout_height="wrap_content"
        android:paddingBottom="5sp" />
    <TextView
        android:id="@+id/tweet_author"
        android:layout_width="fill_parent"
        android:layout_height="wrap_content" />
    <TextView
        android:id="@+id/tweet_published"
        android:layout_width="fill_parent"
        android:layout_height="wrap_content" />
</LinearLayout>
Remember that for the resources to be compiled correctly, the Build Action for both of them should be set to AndroidResource. Next we need to define a list adapter that will translate a collection of Tweets into a view for the list.
public class TweetAdapter : BaseAdapter
{
    private Activity _context;
    private IEnumerable<Tweet> _tweets;

    public TweetAdapter(Activity context, IEnumerable<Tweet> tweets)
    {
        _context = context;
        _tweets = tweets;
    }

    public override View GetView(int position, View convertView, ViewGroup parent)
    {
        var view = (convertView
                        ?? _context.LayoutInflater.Inflate(
                                Resource.layout.tweet_item, parent, false)
                    ) as LinearLayout;
        var tweet = _tweets.ElementAt(position);

        view.FindViewById<TextView>(Resource.id.tweet_text).Text = tweet.Title;
        view.FindViewById<TextView>(Resource.id.tweet_author).Text = tweet.Author;
        view.FindViewById<TextView>(Resource.id.tweet_published).Text = tweet.Published.ToString("f");

        return view;
    }

    // ...some code omitted, see sample project...
I left out a couple functions that are required for the class but aren’t interesting for this post, but you can see the full source in the sample solution at the end. This code simple grabs a Tweet from the results and inflates a view (using the layout in tweet_item.xml) using the values in the Tweet.
Last but not least, we need an Activity that runs everything:
[Activity(Label = "Twitter Search", MainLauncher = true)]
public class SearchActivity : Activity
{
    private Searcher _searcher;
    private ListView _resultsList;
    private TextView _queryText;

    protected override void OnCreate(Bundle bundle)
    {
        base.OnCreate(bundle);

        SetContentView(Resource.layout.main);

        _searcher = new Searcher("http://search.twitter.com/search.atom?q=");

        _resultsList = FindViewById<ListView>(Resource.id.results);
        _queryText = FindViewById<TextView>(Resource.id.query);

        FindViewById<Button>(Resource.id.search_button).Click += delegate
        {
            var progressDialog = ProgressDialog.Show(this, "Searching", "Please wait...", true);

            _searcher.Search(_queryText.Text.ToString(), results =>
            {
                RunOnUiThread(delegate
                {
                    _resultsList.Adapter = new TweetAdapter(this, results);

                    progressDialog.Hide();
                });
            });
        };
    }
}
It sets up a Searcher object, and uses it to find results when the button is clicked. While waiting for the results to come back, we show a progress dialog so the user knows something is happening. Now if you fire up the application, you should be able to run some searches, assuming you have an internet connection of course.
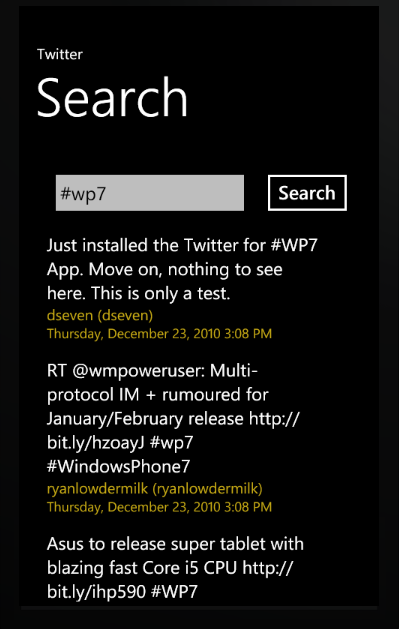
The Windows Phone 7 App
Now that we have a working Android app, let’s build out the WP7 version. The Android version didn’t have much code, and this version will have even less. First we’ll need to define a value converter to format the date/time of a tweet properly.
public class TweetPublishedValueConverter : IValueConverter
{
    public object Convert(object value, Type targetType, object parameter, CultureInfo culture)
    {
        return ((DateTime)value).ToString("f");
    }

    public object ConvertBack(object value, Type targetType, object parameter, CultureInfo culture)
    {
        DateTime converted;

        if (DateTime.TryParse(value.ToString(), out converted))
        {
            return converted;
        }

        return DependencyProperty.UnsetValue;
    }
}
All that does is it takes a DateTime and formats it how we want. You can tweak that to format however you’d like. Next we’ll write up the XAML for the UI, in MainPage.xaml. I will only include the main content section of the page here, but you can see it in context in the sample project.
<Grid x:Name="ContentPanel" Grid.Row="1" Margin="12,0,12,0">
    <ProgressBar IsIndeterminate="True" Name="ProgressBar" Visibility="Collapsed" />

    <TextBox Height="72" HorizontalAlignment="Left" Margin="25,20,0,0" Name="Query" VerticalAlignment="Top" Width="275" />
    <Button Content="Search" Height="72" HorizontalAlignment="Left" Margin="308,20,0,0" Name="Search" VerticalAlignment="Top" Width="129" Click="Search_Click" />
    <ListBox Height="503" HorizontalAlignment="Left" Margin="25,98,0,0" Name="Results" VerticalAlignment="Top" Width="412">
        <ListBox.ItemTemplate>
            <DataTemplate>
                <StackPanel Width="370" Margin="0,10,0,10">
                    <TextBlock Text="{Binding Title}" TextWrapping="Wrap" FontSize="24" Margin="0,0,5,0" />
                    <TextBlock Text="{Binding Author}" Foreground="#FFC8AB14" FontSize="20" />
                    <TextBlock Text="{Binding Path=Published, Converter={StaticResource PublishedConverter}}" Foreground="#FFC8AB14" FontSize="18" />
                </StackPanel>
            </DataTemplate>
        </ListBox.ItemTemplate>
    </ListBox>
</Grid>
That defines the same basic layout that we had in the Android version: a text box, a button and a list of results. There’s also a progress bar that we’ll show and hide when appropriate. Now all that’s left is some modification to MainPage.xaml.cs. To keep things simple for this post I am putting the logic right into the code-behind. In a real app, you would want to use the MVVM pattern to help get this logic out of the code-behind as much as possible, but that’s outside the scope of what I want to cover. Our code-behind will look like this:
public partial class MainPage : PhoneApplicationPage
{
    private Searcher _searcher;

    public MainPage()
    {
        InitializeComponent();
    }

    private void PhoneApplicationPage_Loaded(object sender, RoutedEventArgs e)
    {
        _searcher = new Searcher("http://search.twitter.com/search.atom?q=");
    }

    private void Search_Click(object sender, RoutedEventArgs e)
    {
        ProgressBar.Visibility = System.Windows.Visibility.Visible;
        Results.Visibility = System.Windows.Visibility.Collapsed;

        _searcher.Search(Query.Text, results =>
        {
            Results.ItemsSource = results;

            ProgressBar.Visibility = System.Windows.Visibility.Collapsed;
            Results.Visibility = System.Windows.Visibility.Visible;
        });
    }
}
The logic is much like the Android version, and the experience should be pretty much the same as well if you fire it up. Now we have the same Twitter core library code running on two platforms. Pretty cool, right?
What About Platform-Specific Code?
You might have been wondering what happens when you put code into the source project that isn’t compatible with the profile of one of the destination projects (for example, a call to WebClient.DownloadString exists in the standard .NET framework, but not in Silverlight). What happens then? As you might expect, it just won’t compile. Though not particularly elegant, you can use preprocessor directives to include/exclude code depending on the platform. By default, a Windows Phone 7 app will compile with two symbols you can look for: SILVERLIGHT and WINDOWS_PHONE. You can see these by right clicking on the project and going to Properties, and then going to the Build tab. MonoDroid doesn’t have any set by default, but you can easily add one if you want to check use it.
To use it in your code, it would look something like:
#if WINDOWS_PHONE
    // this code only compiles for Windows Phone
#elif MONODROID
    // this code only compiles for MonoDroid
#endif
Like I said before, it can get a little messy but it does work. Depending in what you’re doing, there might be better options for abstracting out code differences but this can come in handy for some situations.
Summary
Being able to share business logic and write what are essentially UI clients on each platform is a very powerful thing, and keeps you from repeating yourself. With very little effort you could extend it further to have a Silverlight version, a MonoTouch version, or you can use the base .NET version in ASP.NET, WPF or WinForms applications. With each platform you end up with a native application that looks and feels like it is supposed to. Often people ask for a one-size-fits-all solution that can just be run on all platforms, but what you usually end up with is an app that doesn’t feel right on any of them.